Mounting a Scope
Many
shooters prefer using a telescopic sight, rather than the "iron"
sights found on the unmodified Turk. In some cases, it is easier to fit a
telescopic sight than it is to fit "iron" sights after replacing the
barrel.
Three (or four) steps are
required to install a telescopic (scope) sight:
1. The receiver needs drilled
and tapped,
2. The bolt handle needs
reshaped,
3. The safety needs
reconfigured
4. Optionally - (The rear sight
needs removed)
The drilling and tapping is the
easiest part, although offering the greatest chance for error. A mistake made
here can be hard or impossible to fix. The procedure I am going to describe is
the "low budget" method of mounting a scope mount. If you contemplate
drilling more than 5-10 receivers I recommend getting
a professional "jig". These are available for $100-120 and a tap set
for another $65. If you want to try your hand on one rifle, read on.
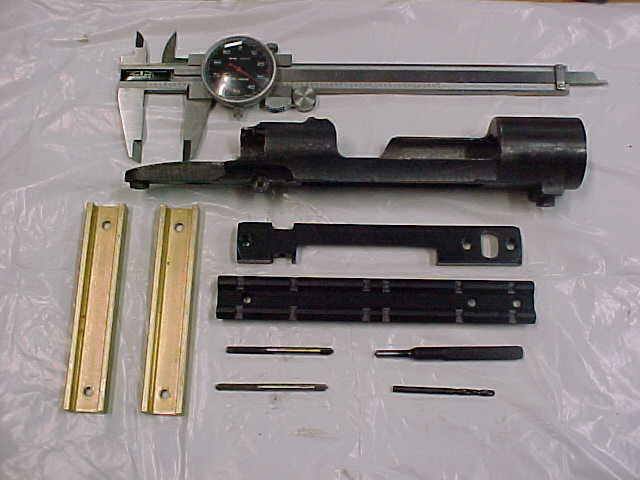
Pictured above are the some of
the things needed to mount a scope base. At the top are stainless steel dial
calipers. We will not be using these for measurements; so don't think that a
micrometer will suffice. The calipers pictured came from Wholesale
Tool for $15.00, $9.95
on sale. If you are reading this, then you need to have a set of these and you
also need to be familiar with Wholesale Tool. These calipers are the same as sold by
Midway for $30 and Lyman for $50.
Below the calipers is a Turk
receiver. This one has the barrel removed, however that is not necessary, but
the bolt and trigger group needs to be removed.
The two black rectangles are
the scope bases. Only one is required. The upper is a Redfield JR-M at $15,
solid steel, with a cut-away area for loading ammo and infinite windage adjustment. The lower one is a B-Square 15010 at
$11. The Redfield is my choice, it's downsides being that it will only accept
Redfield rings (expensive) and fore and aft positioning of the rings is fixed.
The B-Square base accepts standard Weaver bases (cheap, cheap) and allows some
fore-aft positioning. Since we are working on a Large Ring Mauser,
any base sold as such will work, however, stay away from two-piece bases. They
will be very hard to align, may require modifying the receiver and/or mount,
and probably will place the scope too far to the rear.
Below the mounts are two taps,
a drill and a spotting punch. The bases come with 6x48 threaded screws, a
thread form found only in the gun trade. The taps one bottoming and one plug
(and if you just got paid, one taper) come from Brownells,
at $2 each. The drill is a #31, from Brownells, Wholesale . The spotting punch comes from Brownells
(P/N 080-732-006) at $8.
I cannot emphasize the good
things that will happen to you once you have a copy of the catalogs from Brownells,
Wholesale. Once in hand, you can spend an
unlimited amount of money, and can build or repair any hand or shoulder fired
firearm. Brownells is the standard of the trade, just a
little pricey, but not too much, great to deal with, and just about the best
customer service around. Wholesale and KBC
have great buys on all the hand and machine tools you can ever use.
The two golden pieces in the
pictures are spacers, you can see later how they are used.
The main thing about mounting
the base is that it be centered with the axis of the receiver. The Mauser has a wonderfully flat base that makes easy. Once
the base is centered on the axis it will be glued in place and the holes will
be punched, drilled and tapped.
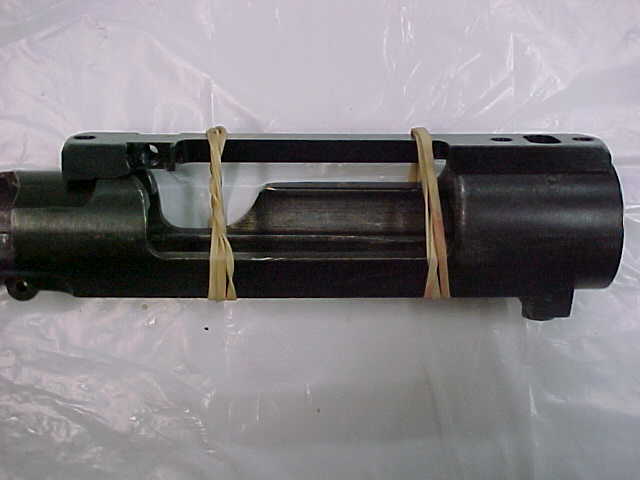
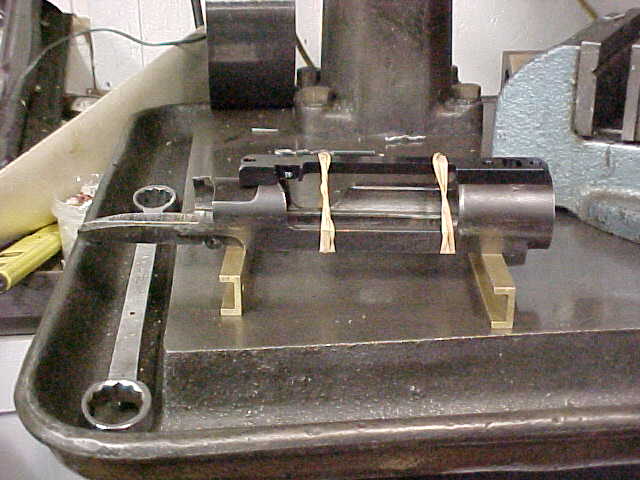
This shows a Redfield JR-M base
held to the receiver with gum bands. Before the gum banding, the receiver and
mount were cleaned to remove all traces of oil, grease n' stuff and a dab of
epoxy was put on the front and rear (bottoms) of the base. The base is slid
forward until the rear of the base begins to touch the charger hump, and the
backed off just a touch.
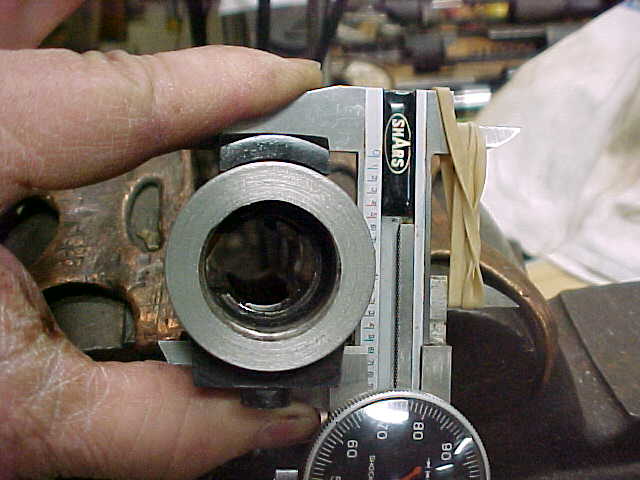
The above picture shows how to
square the base with the receiver. The jaws of the calipers are square and
parallel with each other, and so if the lower jaw is in firm contact with the
flat of the receiver, and the upper jaw is firmly in contact with the flat top
of the mount, then the base will be square with the receiver. Don't use the
calipers as a "clamp", but rather adjust the gum bands holding the
base and receiver together until the base is true.
The epoxy I use is Brownells
"Acra-Glas", although super-glue, or better
Zap-A-Gap works almost as well. But, since you will want to bed the receiver
into the stock, you might as well get one of the $10 bedding kits from Brownells
and use a drop of epoxy from that.
Check often that the base, at
the front and rear, remains true during and after the setting of the epoxy. If
the epoxy sets up and the base is not true - STOP - and do it again.
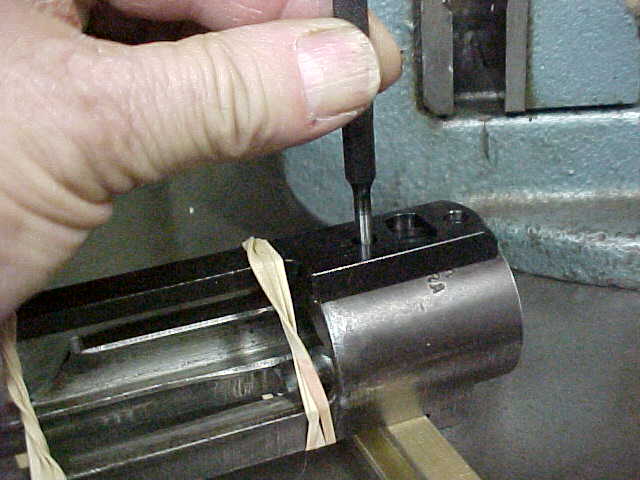
Once the epoxy has set up, the
three holes are center-punched -GENTLY - using the transfer punch.
Now the holes are drilled. The
base is left on and the holes are drilled thru the base. The rear hole is
drilled clear thru. But the two front holes are just deep enough to accept the
screws. Here is where the Turk makes things easy. Because the ring is large and
the barrel threads are small, there is a lot of metal (thick), and if it is a K.KALE action, the metal is tough, but not hard. Use some
cutting fluid, Brownells Do-Drill, $8/pint, or Tap-Free Wholesale and KBC $6/pint.
Some other stuff: The taps will
be held in a tap handle, best (cheapest J ) is Wholesale and KBC, their Asian line is just fine, as is
Tap-Free or Tap-Magic. A $40 table drill press is OK either from Wholesale or KBC. The spacers or parallels are just two
pieces, the same height, even two pieces of pipe would work, but square or
rectangular is best. Hard wood COULD work if your careful. A vise is nice,
mounted to a bench is best but a 4 or 6 inch drill press vise, $10-15 at Wholesale or KBC works
well and can be used on the drill.
Last will be the tapping of the
holes. Start with the plug tap and a few drops of cutting fluid. Reverse the
tap a quarter of a turn every full turn. Don't stir the tap, your not making a cake, hold the
tap vertical and turn, don't wiggle. Clean the hole. Compressed air is OK, just
keep your eyes closed. You can use the taper tap in the rear hole or the plug
tap, but go all the way thru. When the plug tap bottoms in the front holes, use
the bottom tap to run the threads to the bottom.
Clean the receiver, brake drum
or carb cleaner works fine, especially the threads. Install the screws, the
tightening tool will come with the base. If the rear hole extends into the boltway, file or grind it down. If the front screws seem to
long, file them down. (Check this out to
see how.) If you want, a drop
of Lock-Tite or Super Glue can be used on the
threads. The base does not have to be removed from the receiver; the epoxy will
help hold it.